
Nexus 7 rooters: restore to Android 4.1.2 stock for 4.2 Jelly Bean
If you own the Google Nexus 7 slate and are patiently awaiting for the Android 4.2 Jelly Bean update to be delivered over the air to your 7-inch tablet, and if you have already rooted your device with a custom ROM, you will need to make sure the slate is on stock Android so you can gain the official Android 4.2 update.
As the Android Jelly Bean 4.2 update for the Nexus 7 should be released in a few days time, and according to a report by Ibtimes, it is mandatory that your tablet has stock firmware, and as such they have delivered a guide for Nexus 7 rooter on how to restore to Android 4.1.2 stock by way of The Android Soul.
Of course restoring your Nexus 7 back to stock Android means you will lose root access along with SuperSU access, privileges and root based 3rd-party apps.
So let’s get on with that guide…first off it uses a handy tool known as Wug’s Nexus Root Toolkit, which you can download from Here, next you double click on the Root Toolkit zip file to install on your computer. Then you need to enable USB debugging mode by heading to Settings> Developer options, and tick Installation from Unknown Sources, and then connect your Nexus 7.
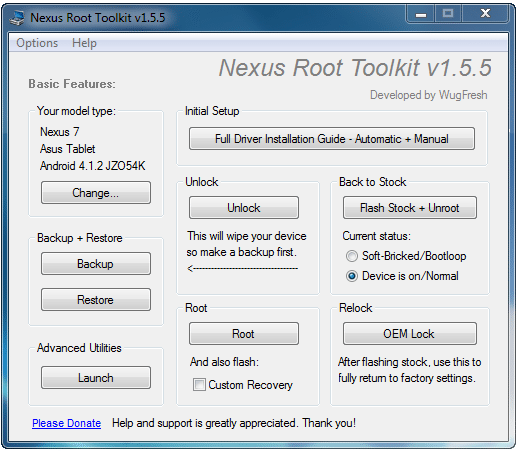
Once you have done the above you go to Toolkit main menu, and hit the Backup button, which will take a full backup of your present ROM, and just wait until this process finishes. The return to the main menu, and tick or enable the Device is on/Normal option under Back to Stock settings. After which you tick the ‘Flash Stock + Unroot’ button, and then click OK in the pop up.
A new message will then pop up and you pick NAKASI: Android 4.1.2 Build JZ054K from the factory image drop down list. You then need to choose Automatic download + extract the factory image selected above for me, and then hit OK.
Next the stock Android 4.1.2 factory image will download, once complete you will be presented with another message asking if you wish to proceed and flash the stock image, so click OK. The device should then boot into bootloader mode and verify the fastboot status. If you receive a Device not detected message, click cancel, disconnect and then reconnect your Nexus 7 and click on the factory image drop down list again, and go through the process again.
Once your Nexus 7 is detected you should see a message prompting for conformation, so click OK. A new DOS window will appear which shows the progress for flashing the Android 4.1.2 firmware, and once complete allow your device to boot into the OS, after which press any key to exit Dos mode.
Then close the Toolkit, disconnect from the computer and your Nexus 7 should now be restored to stock Android ready for that Android Jelly Bean 4.2 update to arrive.
Comments
3 thoughts on “Nexus 7 rooters: restore to Android 4.1.2 stock for 4.2 Jelly Bean”
you can be unlocked and rooted with the stock ROM and get the OTA. Just download rootkeeper so that you can restore root if it breaks.
I have a rooted 4.1.2 (stock ROM with CWM recovery), and it has been asking me to do an OTA update.
When I updated to 4.1.2, I lost root, but it wasn’t difficult to get root back again. I would like to avoid losing root this time.
The problem last time was after updating, at first boot, I was asked about wiping the recovery image, I think it was. There were several options, and I made my choice, then I got a warning and immediately regretted it. I chose the “go back” option, and I got a similar warning, I once again chose “go back” and it committed to the flash option that I was trying to back out of.
I have Titanium Pro, and it also says it can do the same as rootkeeper. I’ll try again and post my notes here.
Well, I had finally gotten to rooting my Nexus 7 because I was already having issues installing to OTA Jellybean 4.2 anyways. I really haven’t been able to find an answer which could explain that, even when locked and unrooted, 4.2 crashes midway thru installation. Where am I going wrong? I could really really use some help