
Sony Xperia Screen Repair Guide – Xperia Z

Are you looking for a Sony Xperia Screen Repair guide online? Well, you came to the right place. Here at PhonesReviewUK, we created an easy to follow guide to fix your Xperia Z’s screen.
If your Sony Xperia Z has a damaged LCD or Touch Screen, all you have to do is to follow this step-by-step guide. It will teach you how to take apart the Sony Xperia Z and replace the desired components.
You can follow this procedure whether you need to restore a cracked screen, replace an important internal component, or you just want to disassemble the device in order to make any applicable repairs.
This simple guide will help you install the following Sony Xperia Z parts or components:
- Sony Xperia Z LCD
- Touch Screen
- Assembly Replacement
- Other Internal Components
Required Tools:
- Safe Open Pry Tool
- Spudger Tool
- Phillips Screwdriver
- Flathead Screwdriver
- Suction Cup Tool
- Adhesive Strips
- Tweezers
- Heat Gun or Blow Dryer
Sony Xperia Screen Repair (Xperia Z) Tear Down Guide
Before we get started with the tutorial, you will need to totally power down your Xperia Z.Next step is to use a heat gun (on low) or a blow dryer to warm the sides of the back cover to loosen the adhesive that holds the back cover of the device. Firmly place a suction cup tool on the back cover to remove the back cover. With the help of the safe open pry tool, loosen the adhesive until you’re able to remove the back cover.
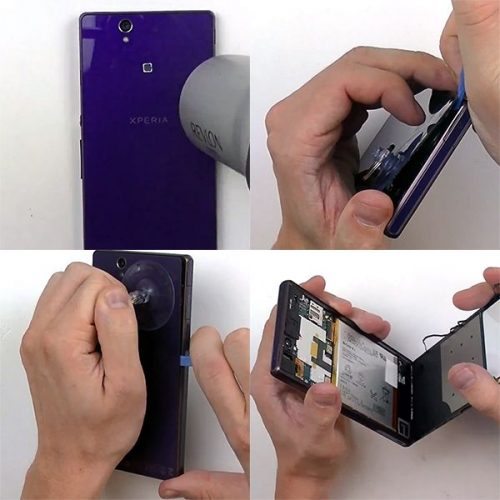
Now, we have the internal components exposed. We need to release the battery connection along with the flex cable that it is attached to. The battery is held in place using a strong adhesive. The yellow and blue highlighted areas in the image below show where the flex cables are located underneath the battery. Once you have removed the battery, you will need to release a few flex cables and the plastic spacer (highlighted in green below in figure 2.2). Using the Spudger tool, you can now remove the vibrate motor (highlighted in purple) located at the bottom right of the Xperia Z. Then you will unscrew the four (4) phillips screws using a phillips screwdriver. Once done, you may now release the housing using your pry tool.

Sony Xperia Screen Repair (Xperia Z) Tear Down Guide – Smaller Components
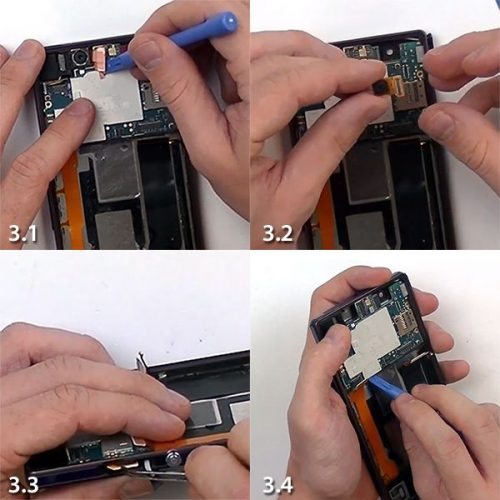
- (Figure 3.1) Remove the main camera that is covered with copper tape by releasing the tape and pop connector.
- (Figure 3.2) Remove the front facing camera by simply releasing the pop connector.
- (Figure 3.3) To remove the sim card, use tweezers.
- (Figure 3.4) To remove the motherboard, make sure that you’re extra careful. Do not tear or rip any of the loose released connections.
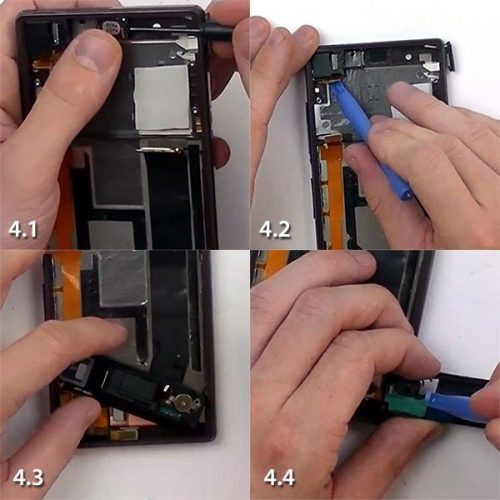
- (Figure 4.1) Using a flathead screwdriver, remove the ear speaker.
- (Figure 4.2) To remove the headset jack and the sensor flex cable, use your pry tool.
- (Figure 4.3) Release the small plastic cover using your pry tool.
- (Figure 4.4) To remove the antenna flex cable, use the pry tool to release the circuit board from the clips in the housing.
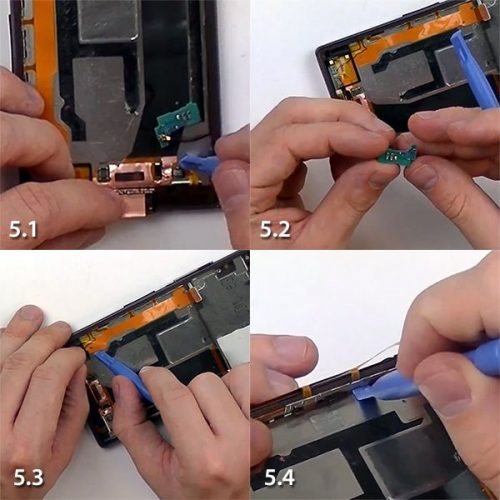
Use your pry tool to complete the tasks below:
- (Figure 5.1) Release the lower flex cable.
- (Figure 5.2) Release the final circuit board.
- (Figure 5.3) Release the side button flex cable with mic.
- (Figure 5.4) Remove the metal bracket that holds the button housing.
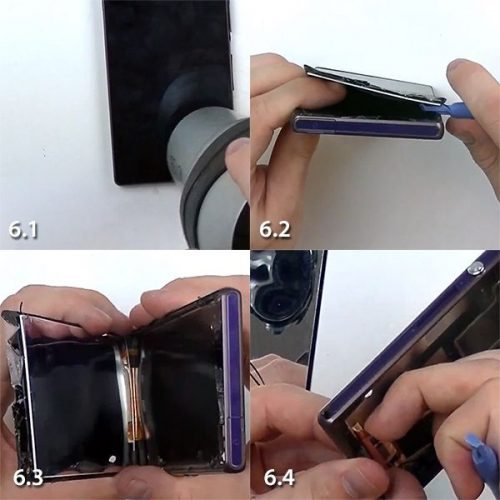
Sony Xperia Screen Repair (Xperia Z) Tear Down Guide – Front Housing Removal
- (Figure 6.1) Use a heat gun (on low) or a blow dryer to heat the corners and sides of the screen assembly for about a minute.
- (Figure 6.2) Remove the screen assembly using your pry tool. You may switch to your spudger tool to gain more leverage underneath the screen.
- (Figure 6.3) Continue to pry underneath the adhesive until you can release the touch screen and LCD combo screen.
- (Figure 6.4) Remove the final flex cable from the housing.
Finally, you can now install the new components while discarding the damaged components. Simply reverse these steps in order to reassemble your device. PhonesReviewsUK’s Sony Xperia Screen Repair guide is for informational and instructional purposes only. Perform this repair at your own risk.
Source: XDA Forum
Live Comment
Your email address will not be published.